Party Time: Fall Harvest

Fall, fall, fall… after what felt like a bit of a slow start, we’re finally full swing into the most wonderful season of the year. We’ve been apple picking, we’ve visited the pumpkin patch, we’ve picked out Halloween costumes, and now it’s time to get outside with our friends to celebrate the bounty that fall has to offer. There’s no need to buy expensive party decorations because mother nature has provided more than enough for you to get the party started. So get out there and enjoy the great outdoors because you know that polar vortex will be here before you know it!

A Feteful Life: Fall Harvest

  1. A grouping of pumpkins always look festive. Simply write a welcome message on one of the larger ones and you will instantly make your guests feel welcome.
  2. This simple yet stunning garland is made out of real leaves! I love it!
  3. Apples and floating candles make a beautiful centerpiece and harken back to the old bobbing for apples game.
  4. Some bundles of hay with some simple fall colored garland makes a fantastic photo backdrop wall.
  5. A punch is one of the easiest ways to serve a big crowd. And, this beautiful apple harvest punch looks amazing!
  6. Looking to unload some of those apples you picked at the orchard? Set up a DIY caramel apple bar and let your guests pick their own toppings.
  7. Doesn’t this stuffed pumpkin look amazing?! Not only does it look impressive, it is filled with everything that is delicious.
  8. Send you guests home with something delicious, like these delicious pumpkin pie parfaits.


Dia de los Muertos Party Inspiration

I mentioned way, way back in our first Fete Favorites my love of Dia de los Muertos. I still haven’t convinced anyone to have an actual party celebrating the holiday, which I really cannot understand. It’s much more upbeat, colorful, and well styled than Halloween. So, I’m obviously going to have to throw myself my own party on November 1st. Here’s what’s topping my list of inspiration.

A Feteful Life: Dia de los Muertos

1. These gorgeous wedding invitations are obviously slightly more upscale than I need for my own party, but I love the idea of combining the bold colors with geometric prints.

2. I love the idea of a large communal table for dinner and that table runner is ahhmaazing.

3. Sugar skulls + edible confetti = party happiness.

4. Mini tissue paper flowers for striped straws!? That’s a new one (to me) and a must make.

5. Pan de Muerto is a traditional Day of the Dead pastry and looks delicious.

6. Obviously our Almond Milk Horchata Cocktail will be in circulation (and probably our Blood Orange Tequila + Lime Spritzers, too).

7. Decorated candles look like a simple enough DIY to help keep things festive.

8. Papel picado!

9. I’ve really been waiting for a good time to try a honeycombed wall and this seems like the perfect opportunity.

DIY Watercolor Art

A Feteful Life: DIY WatercolorDuring the summer my son came home from camp with a simple scribbled drawing in crayon that was covered with watercolor paint. I adored it and it gave me some great inspiration for this easy DIY project. I always have a hard time finding art for my home. I’m well past the point in my life where I’m hanging movie posters on the wall but still can’t really afford a one of kind piece of art from a gallery. So, what’s a girl to do? Make her own art of course. And, it’s so simple that you should do it as well. Here’s how to do it.

A Feteful Life: DIY WatercolorI decided to keep my design simple and graphic so it was easy to sketch out on a piece of graph paper.

A Feteful Life: DIY WatercolorOnce I finalized my design, I went over with with a dark black pen so it would be easy to trace onto the watercolor paper.

A Feteful Life: DIY WatercolorNo light table? No problem. I just taped my graph paper to a glass door (or window would work) and placed the watercolor paper over it. Instant light table! I also used masking tape to tape a border for my painting. This isn’t necessary but helps create nice clean lines if you want them.

A Feteful Life: DIY WatercolorOnce I had the watercolor paper all taped up, I used a white crayon to trace over the design. Please do not use a washable crayon if you are using watercolors as the crayon will wash away as you start to add the color. You want a nice waxy crayon to repel the water.

A Feteful Life: DIY WatercolorIt’s a bit hard to see but you can see the white crayon lines on the paper.

A Feteful Life: DIY WatercolorYou don’t need fancy supplies to make art! I’m using the kid’s watercolor palate from IKEA along with their paintbrushes.

A Feteful Life: DIY Watercolor

A Feteful Life: DIY Watercolor

A Feteful Life: DIY WatercolorNow, just start painting… whatever colors your little heart desires. I usually do a wash of my base color first and then add some little variations of colors once that base is down.

A Feteful Life: DIY WatercolorOnce the paint has dried remove the masking tape boarders and then trim the paper down to whatever size you want. Voila. Easy DIY art that anyone can do. Fete on!

8 Amazing DIY Plastic Animal Transformations

As I’ve mentioned here and here, I love transforming items with the help of spray paint. It’s so inexpensive, it’s so easy, there are so many color options, and it gives new life to something that would otherwise be discarded. And, these adorable animal transformations are no exception. I love all of them so much and want to try all of them.. right now!

The pig as a place card for a rustic wedding, the elephant bookends, the gilded magnets… they are all so amazing and inspiring. Now I just need to decide which one I’m going to try first. I think it’s going to have to be the magnets! They are just too fabulous.

A Feteful Life: Spray Painted Animals1/2/3/4/5/6/7/8


DIY Painted Tin Cans

A Feteful Life: Painted Tin CansEver since I did those spray painted pumpkins for Thanksgiving last year, I’ve been looking for any excuse to transform things with spray paint. And this is one of the easiest and most inexpensive transformations that I’ve done. Think twice before tossing that empty tin can in the recycling bin because that can be a custom vase, pencil holder, make-up brush holder, utensil holder or planter (i.e., pretty much anything you want it to be) within just a few minutes with a few easy steps.

A Feteful Life: Painted Tin CansWith either painter’s tape or simple masking tape, tape off the portion of the can that you don’t want to paint. Any size you want. You could even do stripes if you wanted to, but I just did a solid area because I wanted the can to have a dip-dyed effect. Also, make sure the tape along the edge that you’re painting is pressed smoothly against the can or the spray paint will bleed under the tape.

A Feteful Life: Painted Tin CansDon’t over spray to get a full coating on the first time. Spray paint works best with several thin layers built up on top of each other. This is especially true when working with the tin cans because if you over spray, the excess paint might drip into the ridges of the can.

A Feteful Life: Painted Tin CansThe can in three various levels of being painted. First coat for the white, second coat for the purple and final coat on the mint green.

A Feteful Life: Painted Tin CansRemoving the tape after the spray paint has dried. Last step, deciding how you’re going to put these cans to use!

A Feteful Life: Painted Tin CansA Feteful Life: Painted Tin Cans

DIY Kids Party Favors

I know some people are anti kids party favors, but I have to say that I am firmly in favor of them. I think it is important for my kids to understand that having friends attend a party, whether or not a present is involved, is something they should be thankful for and show their appreciation. And I feel like they get that and truly want to show their thanks to friends and family for helping us celebrate. That said, I always try to have my kids help me make party favors for their party and generally provide something either consumable, educational, and/or not just more plastic toys. I happened to LOVE the DIY rock candy party favor we had at our science club last month, which got me thinking about what favors I might get together for upcoming kids parties. Here are some of my favorites!

A Feteful Life: DIY KId Party Favors

1 / What kiddo doesn’t love making art? Lovely Design put together these adorable collage packets to send a little art project home with each child. Perfect for post-party-sugar-rush winding down at home.

2 / I’ve wanted to make story stones for my kids for some time now and I think a little muslin bag with a few stones would be the perfect thing to help keep a kiddo occupied on the ride home.

3 / OK, so this one is candy, which I try not to do since I’ve inevitably just filled up kiddos on sweets at the party. BUT sending this bubblegum necklace home in a little kit for each child would be a great consumable activity.

4 / It looks like tasty salt water taffy, but this one is ingeniously disguised sidewalk chalk. What a perfect favor for a summertime party!

5 / Another win for Lovely Design with these personalized pennant flags. I like to try make party decorations last by using them in my childrens’ rooms. I love that Lovely Design took this concept to favors and I can imagine all the littles so excited to find their own initialed flag.

Free Printable Lunch Notes

A Feteful Life: School Lunch Notes

I don’t know how it’s possible but my first born is headed to first grade in two short weeks {tears}. It’s true what they say, kids grow up so very fast. So, with the new school year looming ahead, I’m coping by focusing on what I love about this time of year…  buying mountains of  school supplies, new clothes, new backpacks & lunch bags, etc.

Apparently first grade is a big leap year in our school district, which means a lot more academic work and homework. I know it’s going to be an exhausting start of the year for him so I want to do some special little things for him to help him ease into the year. I would put notes in his lunch periodically last year and he would always come home excited on those days telling me how much he loved his note. So, this year I’m designing some pre-made notes (along with a blank one to write personal notes) to ensure he has those special moments more often. And, lucky for you, I’m giving the free printable as well! So just print, cut and make your kid’s day. Here’s to a great school year!

A Feteful Life: Printable School Lunch Notes

Lunch Notes Pics-2

A Feteful Life: Printable School Lunch Notes

A Feteful Life: Printable School Lunch Notes

A Feteful Life: Printable School Lunch Notes

A Feteful Life: Printable School Lunch Notes

Fete at Home: DIY Cedar Railing

A Feteful Life: DIY Cedar Railing & Gate

When we bought our house three years ago, there was a lot of work that needed to be done to the house both on the inside and outside. For the first two years, the interior took priority resulting in a new kitchen, small addition, HVAC overhaul, and new windows just to name a few. Slowly our focus has been shifting to our backyard as the kids get older and their desire to play outside on their own grows.

My biggest area of concern with letting the kids head out there on their own is what we affectionally called the “Pit of Death” — a very open area where steps lead down to our basement door. There was no good way to secure the area without installing some kind of railing and a gate. We contacted several contractors and their estimates were ridiculously high so we decided we could design and build something better and for much less money (it helps that Jim is game to tackle most of my crazy project ideas).

So, with a few design meetings, a trip to a local building supply store (they had a much larger selection of wood than Home Depot or Lowes), and a day of labor we have our custom DIY railing and gate. I am absolutely in love with how it turned out and it was a much easier project than either Jim or I anticipated! Here’s what you need and how we did it…

Supplies:

2×4 pressure-treated studs
1×2 pine furring strips
1×6 Cedar (for the top rail)
Tongue and Groove Cedar Paneling
Wood Screws
Masonry Bolts (sleeve anchors)
Hinges
Hook & Latch
Hammer Drill (to drill into the brick)
Circular Saw (although a mitre saw would have been more helpful)

Total Cost: $250 (excluding the drill and saw)

A Feteful Life: DIY Cedar Railing & GateA quick sketch to ensure designer(me) & builder(Jim) are on the same page
A Feteful Life: DIY Cedar Railing & Gate
A Feteful Life: DIY Cedar Railing & GateLaying out the 2x4 frame of the railing before securing any of the pieces together

A Feteful Life: DIY Cedar Railing & GateJim built the frame before securing it to the brick ledge and wall

A Feteful Life: DIY Cedar Railing & Gate
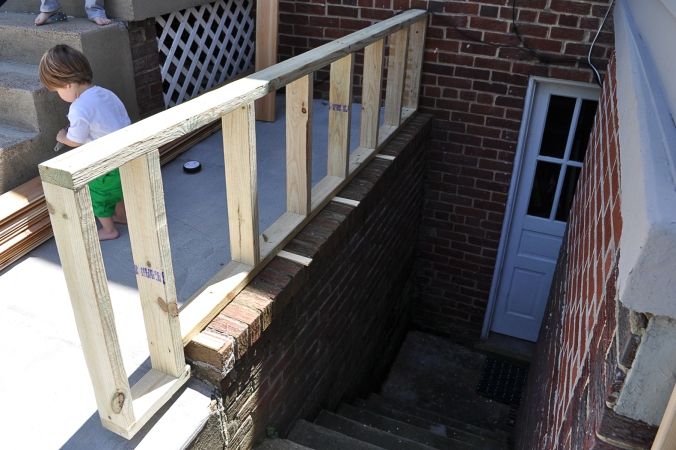
Make sure the frame is plum and level before securing by using shims (a cute helper doesn't hurt either)

A Feteful Life: DIY Cedar Railing & GateSecuring the frame to the brick with sleeve anchors

A Feteful Life: DIY Cedar Railing & GateOnce the frame was anchored, Jim started by adding a piece of 1x6 cedar as the cap piece
for the railing

A Feteful Life: DIY Cedar Railing & GateWe used inter-locking tongue & groove cedar to make the horizontal paneling of the
railing. Since our railing was longer than the 8' long pieces, Jim made sure to 
cut the pieces at varying lengths. 

A Feteful Life: DIY Cedar Railing & Gate
A Feteful Life: DIY Cedar Railing & GateThe last piece was a bit tricky because our concrete pad slopes away from the 
house. After some careful measuring and cutting we got a perfect fit!

A Feteful Life: DIY Cedar Railing & GateAfter all of the side paneling was installed, we used another piece of 1x6 cedar to cap 
off the front of the railing

A Feteful Life: DIY Cedar Railing & GateThe final step was building and installing the gate. We cut the tongue and groove 
cedar paneling to an equal size and braced the door with 1x2 furring strips.

A Feteful Life: DIY Cedar Railing & Gate
A Feteful Life: DIY Cedar Railing & GateWe bolted a piece of 1x6 cedar to the wall to the right of the stairway and mounted the gate to it. Once the hardware was added to the gate, it was
ready to be installed. 

A Feteful Life: DIY Cedar Railing & GateA little teak oil and a day to dry and we have our perfect (and safe) solution!


DIY Picnic Printables

A Feteful Life: Picnic Printables

One of my most favorite things about this summer thus far has been the vast number of picnics we’ve been having. From front porch lunches, to outdoor music concert dinners, we’ve been eating outside a whole lot. It means less cleanup for me and an ability to stay out and about for longer periods of time. And my whole family’s been loving it. But just because it makes things more simple, doesn’t mean it has to be plain. So I had in mind to put together a printable set of fun labels to dress our picnics up a bit. Then, in fortuitous timing, party supplier PartyPail asked us if we’d like to test out some of their plain party goods. Perfect!

In keeping with my current love of the black + white combo, I designed a set of labels and straw flags that I used on a variety of PartyPail’s great picnic goods (plain white cups, chevron dessert cups, large clear cello bags, and striped straws). And I loved the printables so much that I decided to share them with you for free. Just click on the link at the end of the post to download them. Print the circle labels on plain white label sheets and punch out with a 2″ circle punch. Print the straw flags on white paper or cardstock, cut out, and glue on a striped straw. Always simple, never plain!

p.s. my easy picnic menu? salted watermelon + chèvre + mint; prosciutto + mozzarella + basil baguettes; dark chocolate almond bark with sea salt

A Feteful Life: Picnic Printables

A Feteful Life: Picnic Printables

A Feteful Life: Picnic Printables

A Feteful Life: Picnic Printables

A Feteful Life: Picnic Printables

A Feteful Life: Picnic Printables

CLICK RIGHT HERE FOR PICNIC PRINTABLES!

Disclosure: PartyPail provided AFL with paper party goods in exchange for this post. No other compensation was provided and all opinions herein are our own.

Tropical Party Ideas

If yesterday’s cocktail hour post was any indication, I clearly refuse to believe that our tropical vacation is over. Therefore, I’m desperately trying to convince anyone who will listen that we should throw some kind of tropical party. No particular celebratory event or tropical destination necessary. Just, “yay, tropical!” Here are my top five tropical party favorites:

A Feteful Life: Tropical Party Ideas

1 / Paper & Stitch’s DIY honeycomb garland and drink stirrers — love, love the bright colors of these honeycomb.

2 / Tropical cocktails are a must, but no one wants to get stuck behind the bar (even if it is a tiki bar). I would definitely give this Paradise Punch from TheKitchn a go.

3 / There’s a jerk at every party, but I’d keep these festivities friendly with Jerk Shrimp Tacos + Pina Colada Crema.

4 / My kids would lose it over these DIY Fruit Balloons from Oh Happy Day. Fabulous!

5 / In case you missed ’em in our cocktail hour yesterday, I’m obsessed with these rainbow-colored whole fruit ice pops from 84th & 3rd, all of which have boozy options. Make some without for the kids and make everyone happy.